มามะมาลองมัลติรอมสำหรับเจ้าโน๊ตสามพลังมังกรกัน
อันนี้ผมมีเครื่องทดสอบเฉพาะ เครื่องในพลังมังกรไฟ แต่คิดว่า รุ่นพี่ชิพเอ็กซ์ก็คงใช้งานได้เหมือนกันมั้ง
ปล. ขอโพสควบคู่กับภาษาอังกฤษนะครับ อันนี้พิมพ์ Docs ในโทรศัพท์ถ้ามีอะไรผิดพลาด หรือตกหล่นจะตามมาแก้ไขให้ภายหลังนะครับ
ถ้าหา PC ได้ จะตรวจเช็คโดยละเอียดให้อีกรอบนะครับ ส่วนรูปภาพขั้นตอนต่างๆ ถ้ามีเวลาว่างๆจะแคปแล้วใส่ตามมาให้อีกทีนะครับ
Multi Boot Note 3 [Guide] (Updated 24/07/2015)
Supported Devices: ( Tested and confirmed working )
ปล. อันนี้ขอเอามาจากต้นทาง ให้เครดิตผู้ทดสอบกันหน่อย
SM-N9005 (International Qualcomm): hlte (Tested by me ) อันนี้ทดสอบเอง ใช้งานได้จร้า
SM-N900T (T-Mobile US): hltetmo (Tested by @MistaEast ) confirmation post
SM-N900R4 (US Cellular): hlteusc (Tested by @harshal10398 ) confirmation post
SM-N900 (International Exynos): ha3g (Tested by @mohnishkat ) confirmation post
SM-N900P (Sprint): hltespr (Tested by @lord dredd ) confirmation post
SM-N900K(Korean): (Tested by @Premananda_laishram) confirmation post
สิ่งที่ต้องเตรียมก่อนทำการทดสอบรอมของชาวดรอยด์ผู้ซุกซน
* Backup Nandroid อย่างด่วน และ ฟูลแบคอัพเผื่อผิดพลาดทางเทคนิค สำคัญนะเดี๋ยวพลาดขึ้นมาข้อมูลหายนะ
* Rooted สิจ๊ะ คิดว่าคงเรียบร้อยกันตั้งแต่เปิดเครื่องแล้ว
* เคลียร์ internal storage ให้โล่งเพื่อลงมัลติรอม (for example a Cm based roms take up to 2.5GB to 3.5GB and a TW roms take up to 5GB or more.)
ตามนี้นะ เผื่อๆไว้ถ้าลงหลายรอมก็เผื่อไว้เยอะหน่อย ขั้นต่ำต่อรอมก็ 2.5กิ๊กโดยประมาณ
Instruction:
1.Download your desired Rom which you want to use for multi booting and the mods, addons, gapps, Kernel etc for the same. Keep the files in your internal memory.
โหลดสิจ๊ะ โหลดเลยอยากลองรอมตัวไหนรีบหามาให้ไว เอาให้ตรงรุ่นตัวเองด้วยนะ
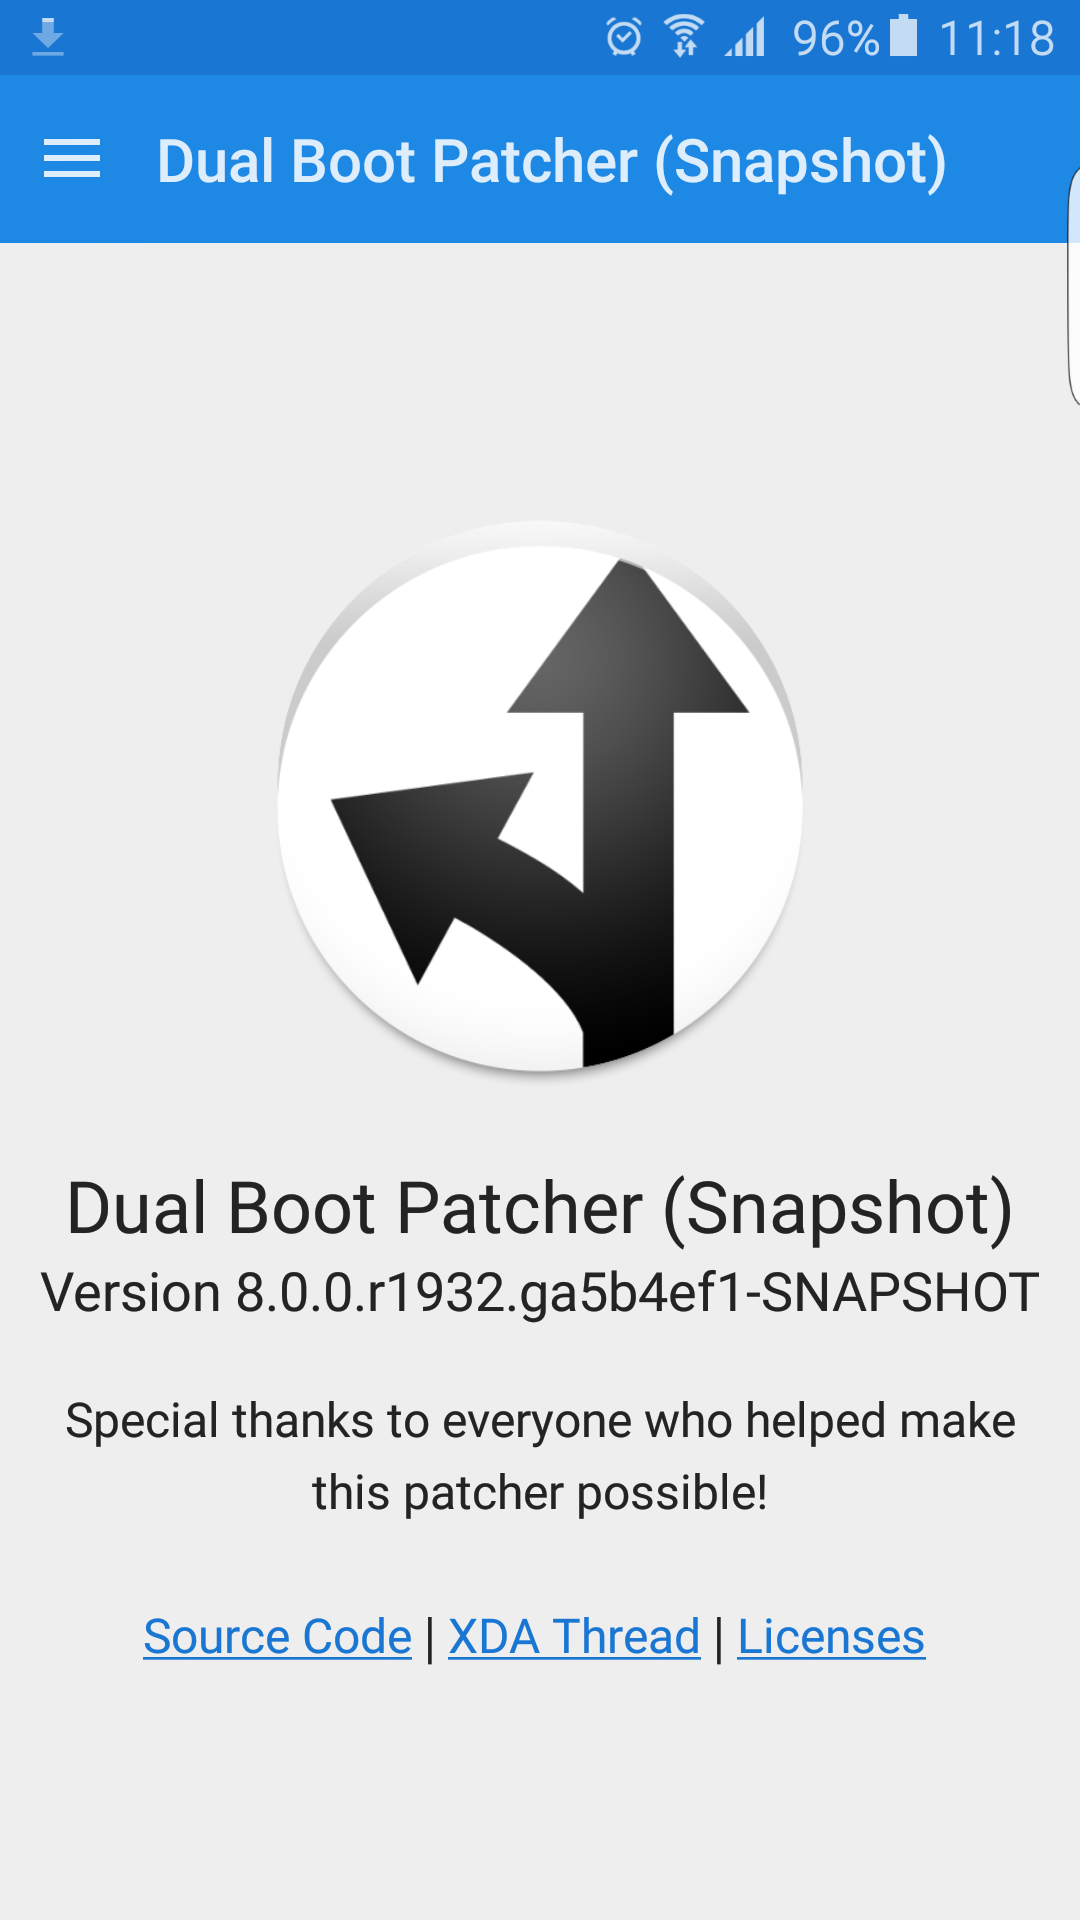
2. Download the most recent snapshot release of Dual Boot Patcher (https://snapshots.noobdev.io/) and install it on your Note 3.
โหลด Dual Boot Patcher (https://snapshots.noobdev.io/) แล้วติดตั้งให้เรียบร้อย
3. Open Dual Boot Patcher and grant SU permission. Then go to ROMS and you will see your Primary rom, press the 3dotmenu key and click “set kernel”. If it fail to set kernal please read the FAQ.
เปิดสิจ๊ะ เปิดแอพแล้วก็บอกผ่านโลด ให้ทำงานได้ผ่าน SuperSu
กดเมนูแล้วเลือก ตรง ROMS ก็จะเจอ ชื่อรอมหลักที่เราใช้งานอยู่ กดเมนูมี่ปุ่มสามจุด แล้วเลือก set kernal

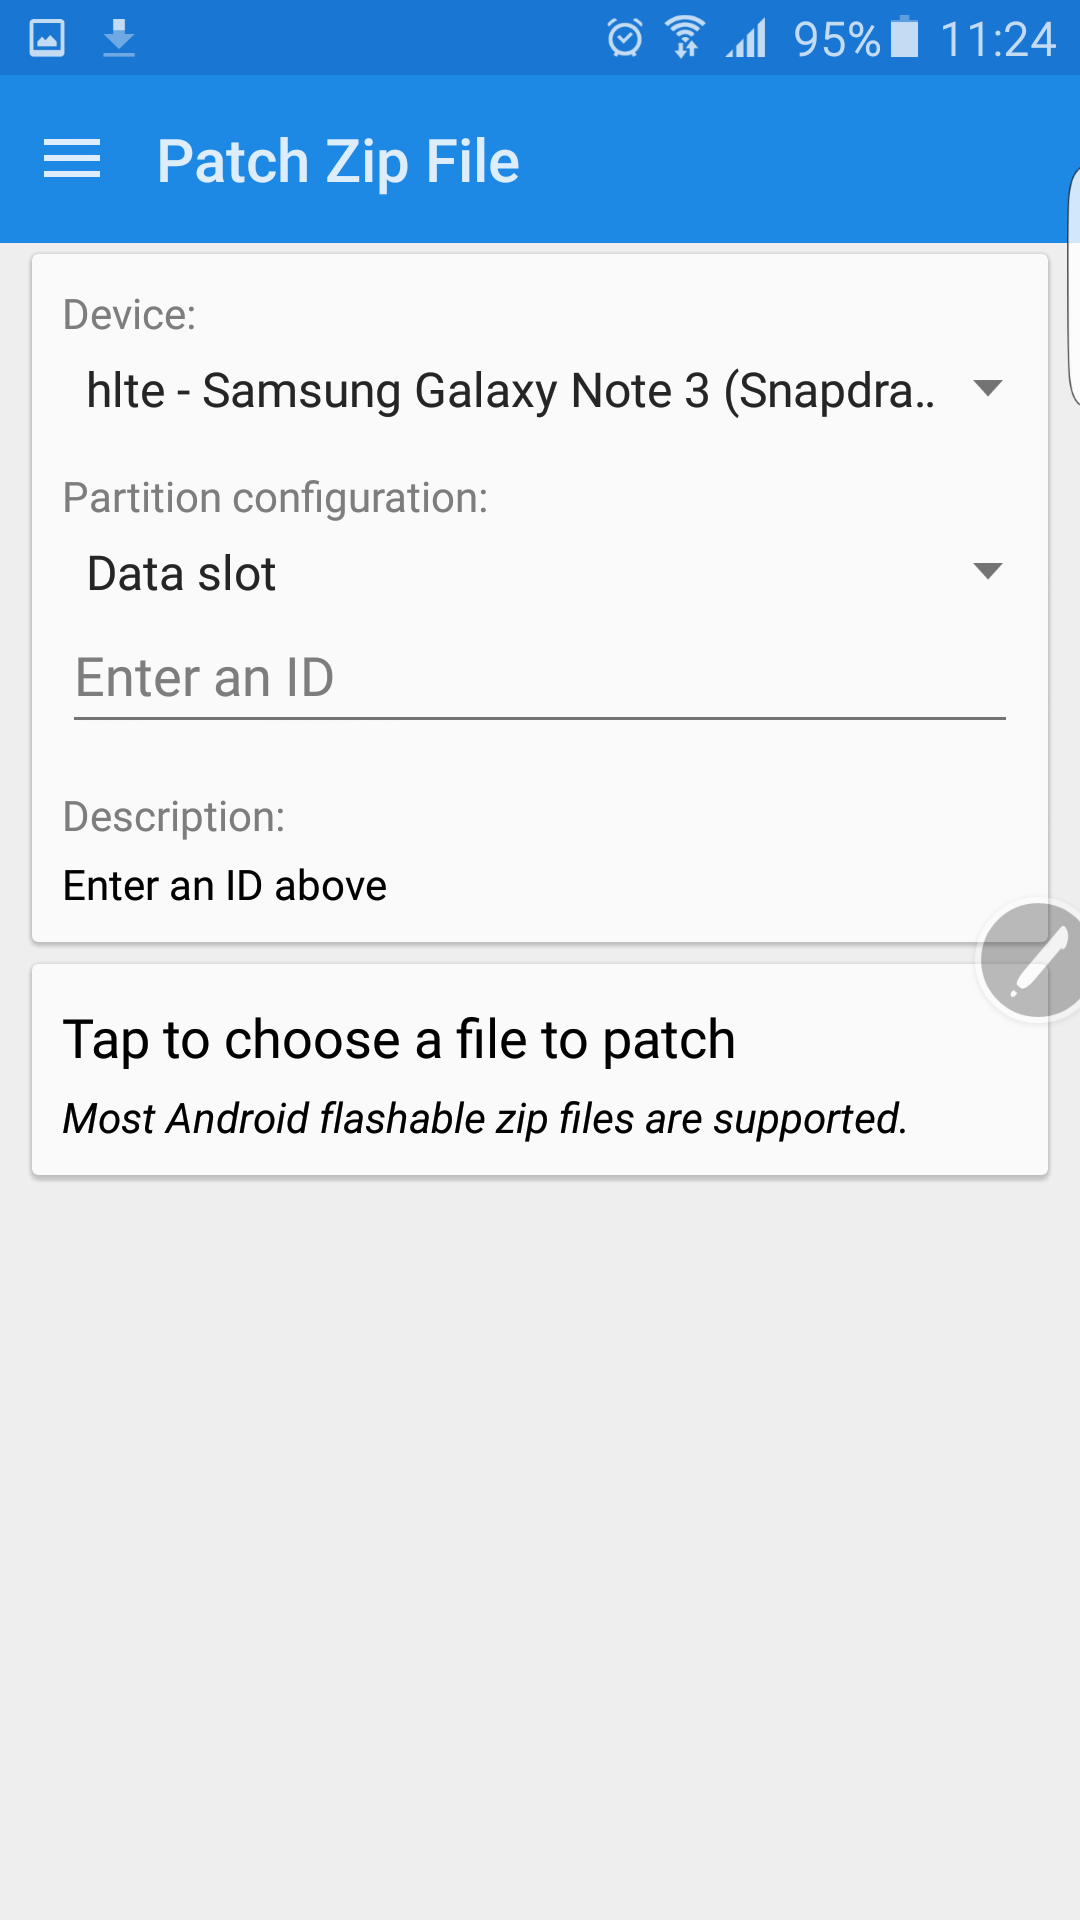
4. Then In Dual Boot Patcher go to Patch Zip File and Choose hlte for snapdragon variant and ha3g for Exynos veriant (Samsung Galaxy Note 3) from the drop down menu.
ขั้นตอนต่อไปมาแพทช์รอมที่เราต้องการใช้งานกัน
ไปที่ menu เลือก Patch Zip File เลือก hlte for snapdragon variant and ha3g for Exynos veriant (Samsung Galaxy Note 3) จากตัวเลือกช่องแรก
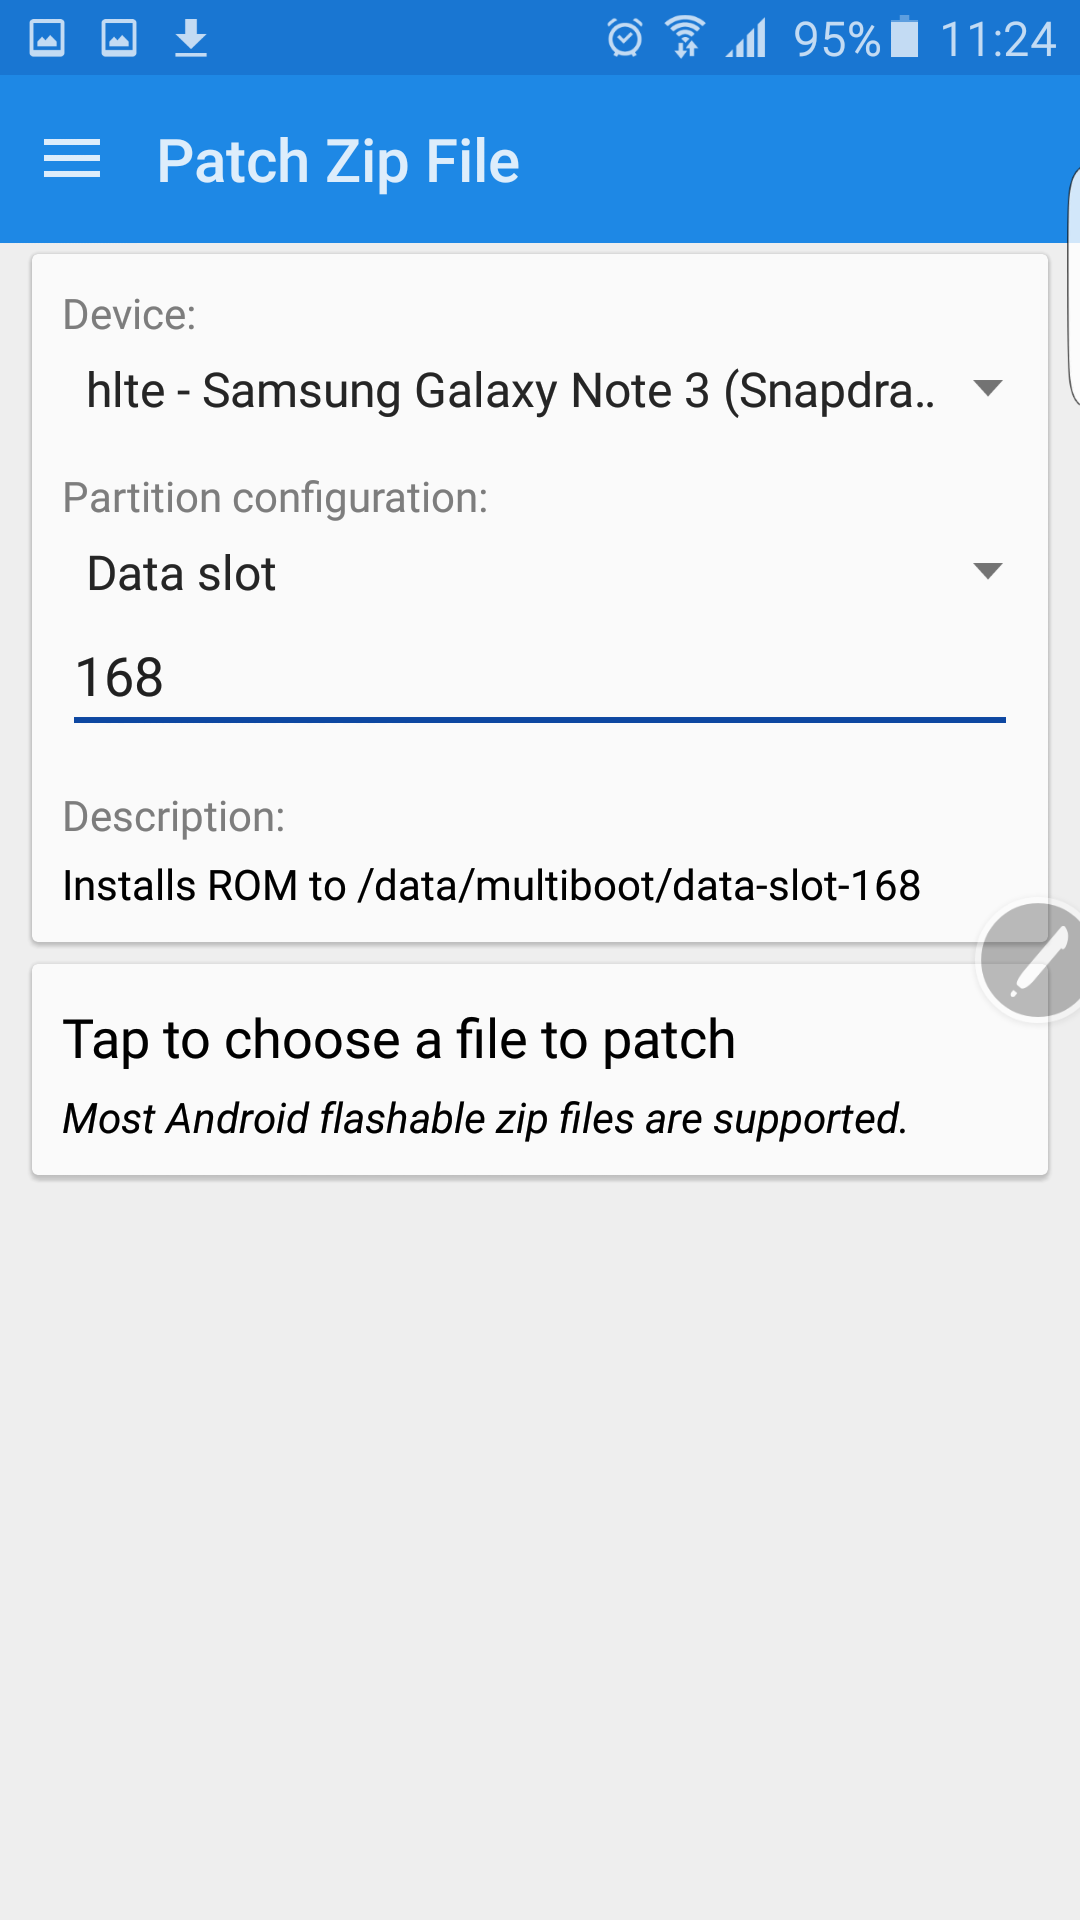
5. In the second drop down menu select “Data Slot”.
ตัวเลือกช่องที่สองเลือกที่ Data Slot

6. Below that you have to enter the ID of the secondary rom.(Example 1, 2, 3, etc. – it will take it as /data/multiboot/data-slot-1)
ที่ช่องว่างข้างล่างให้ใส่เบอร์สลอตอ้างอิง เพื่อใช้ในการอัพเดทรอมเวอร์ชั่นใหม่ , Gapps , Mod ของรอมที่เราใช้งาน ใส่เลขที่ต้องการตามสะดวก แล้วแอพจะสร้างโฟลเดอร์เพื่อเก็บรอมตามดาตาสลอตที่เราเลือกเช่นเลือก Slot1 จะมีการสร้างโฟลเดอร์ที่ /data/multiboot/data-slot-1
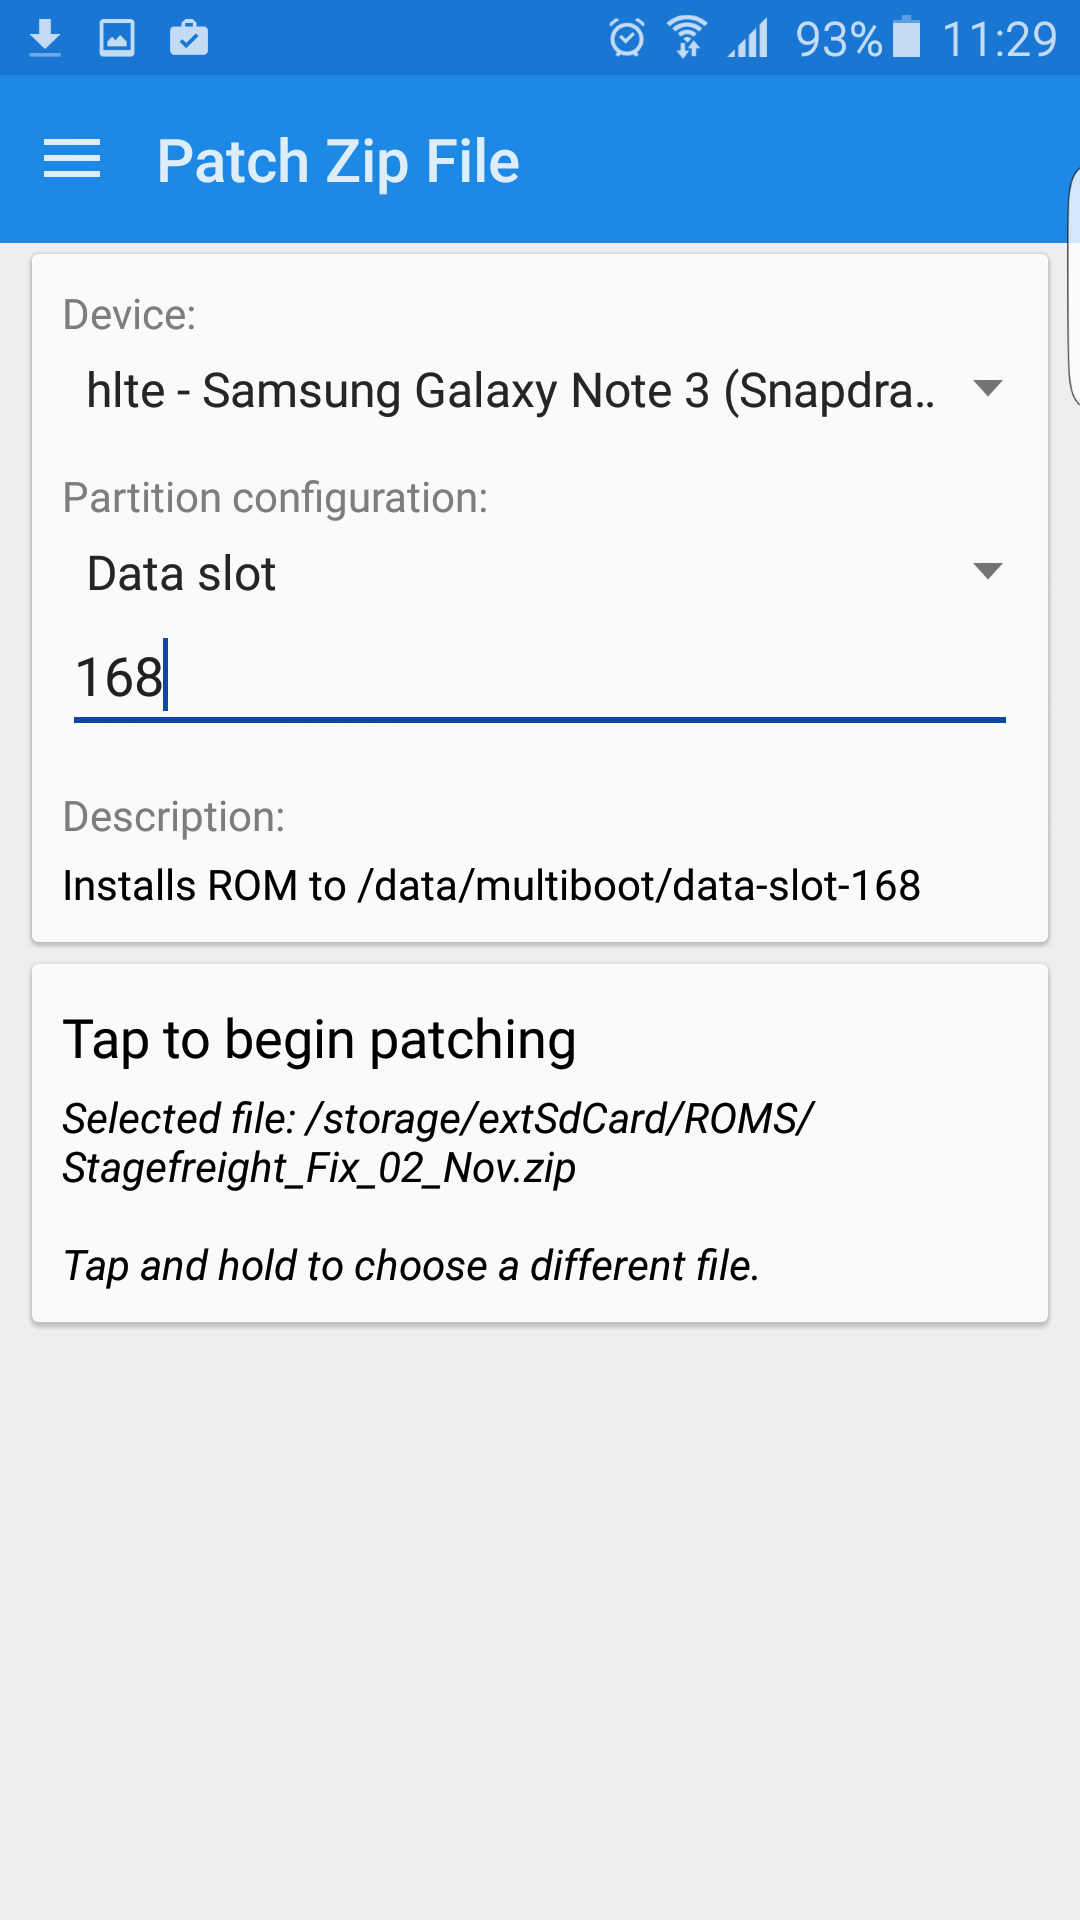
7.Now tap on the below button to choose the ROM’s, Gapps, Kernel and mods to patch them and make them perfect for Multi booting.
กดปุ่มข้างล่างเพื่อเลือก ROM , Gapps , Mod ที่ต้องการแพทช์

8. Always remember to keep same slot ID for the Gapps, kernels and mods same as the rom. (Example: if you want to flash the gapps/kernel to the data-slot-1 rom then you have to select the same ID that’s 1 or if you want to flash the gapps/kernel to the data-slot-2 rom then you have to select the same ID that’s 2.)
อันนี้สำคัญมากต้องเลือกสลอตของ ROM , Gapps , Mod ของรอมตัวเดียวกันใช้เบอร์สลอตเดียวกัน
9. When selecting the files except cm rom zip there will be a “preset” drop down menu, from that you have to select according to the file you are going to patch. (Examp: for roms, kernels, mods, addons – custom; for gapps – Google_Apps; for Su zip – other/SuperSu; For xposed-Other/Xposed)
ถ้าพื้นที่ในเครื่องเพียงพอโปรแกรมก็จะแพทช์รอม รอจนครบ 100% ถ้ามี GAPP หรือ Mod ก็ทำเหมือนเดิมอย่าลืมว่าเบอร์สลอตต้องตรงกับสลอตของรอมที่เราแพทช์ด้วยนะ
10. Now press the tap to begin patching button to patch the file. And you will get a new patched zip file in the same location.
กดปุ่มเพื่อให้โปรแกรมทำการแพทช์ ROM ได้เลยจร้า
ไฟท์ใหม่จะอยู่ในโฟลเดอร์เดียงกันแต่จะมีชื่อต่อท้ายข้่งหลังด้วยเบอร์สลอตที่เราเลือกไว้
11. Now Boot into custom recovery and flash the new patched file and reboot.
หลังจากทำการเตรียมไฟล์เรียบร้อยก็ รีสตาร์ต บูตเข้า Recovery Mode ถ้าใครยังไม่แบคอัพ ยังแบคอัพตอนนี้ทันนะ
แฟลชไฟล์ที่พึ่งทำการผ่านกระบวนการโมได้เลยจร้า ROM , Gapps , Mod มีอะไรก็แฟลชให้หมด
ระวังอย่าแฟลชผิดไฟล์นะ เดี๋ยวจะบูตไม่ขึ้น
แฟลชเสร็จจัดการรีสตาร์ต แล้วก็รอๆๆๆ
12. And your device will boot into New Rom.
แล้วเครื่องจะบูตเข้ารอมใหม่ที่เราพึ่งทำการติดตั้ง
13.Install the Dual Boot Patcher app and set the kernel for your second ROM as well.
ติดตั้งโปรแกรม Dual Boot Patcher แล้วทำการ Set Kernel ให้กับรอมใหม่ที่พึ่งติดตั้งด้วย
14. To switch between roms
•Open Dual Boot Patcher app/roms and click on primary or secondary rom as you like and reboot.
•Or Use Swap Roms to switch between Roms.
* Important things to keep in mind: while installing a rom or mod with Aroma installer don’t reboot directly from the aroma.
You have to always uncheck the last option to reboot in aroma and click finish. So it can finish the final steps for multi booting.
And if you miss that it will only reboot to recovery. To boot back you have to flash your primary rom kernel or re-flash the patched rom.
การบูตเข้า ROM ที่เราติดตั้งไว้ ให้เข้าโปรแกรม Dual Boot Patcher เลือกเมนู ROM แล้วเลือกROMที่จะใช้งาน เสร็จแล้วก็ Reboot มันจะเข้า ROM ที่เราเลือกให้เลย
Never update a secondary rom through OTA Update.
ห้ามอัพเดทรอมผ่าน OTA เป็นอันขาด
ลงแล้วก็จะมีรอมโผล่มาให้เลือกใช้งานแล้วจร้า
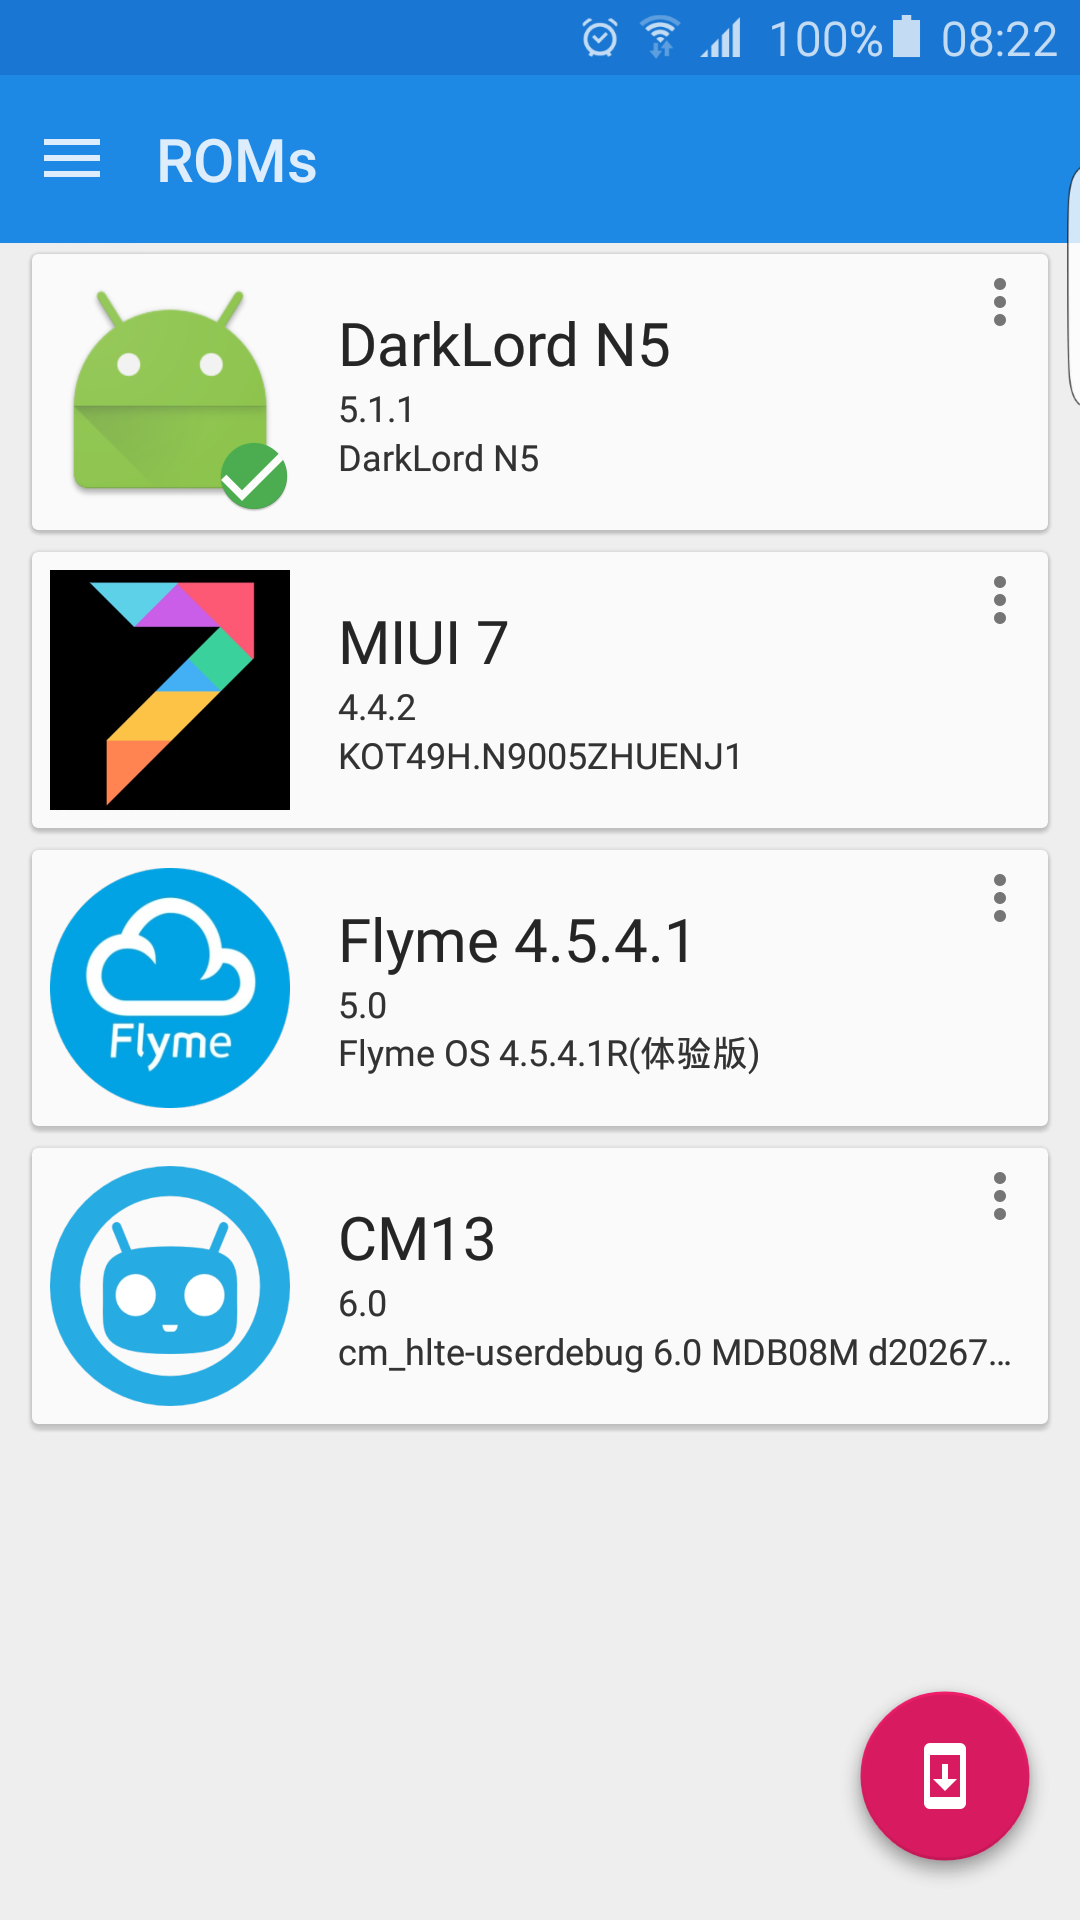
การเปลี่ยนไปใช้รอมตัวอื่น ให้เลือกรอมที่ต้องการใช้งาน อล้วทำการรีสตาร์ตก็จะบูตเข้ารอมที่เราเลือกให้โดยง่ายดายจ้า…
ขอบคุณครับ
ขออ่านให้ละเอียดก่อนนะครับ
เวอร์ชันใหม่ล่าสุด อินเทอร์เฟซ เปลี่ยนไปเยอะมาก แต่เมนูคำสั่งต่างๆยังไม่เปลี่ยนไปเท่าไหร่ ใช้ข้อมูลเดิมอ้างอิงได้ครับ
ลองแล้วงงครับ เจ๋งดีครับ ตอนแรกก้องงๆอยู่ พอไม่งงเท่านั้นแหละ ผ่านเลย ^^
ขอบคุณบทความดีๆครับ
ทำไมของผมไม่สามารถกลับไปรอมหลักได้ละครับ
งง…มากๆ ลองหลายรอบแล้ว
กลับไม่ได้นี่คือ เข้า Dualboot patcher แล้วไม่เห็น ROM หลักป่ะครับ ?
แก้ไขได้รึยังครับ พอดีพึ่งเข้ามาเห็น
ขอบคุณทุกๆท่านครับ
ตอนนี้ใช้ได้แล้วครับ
แต่งยังอยากทราบว่ามีวิธีเคลียร์
แบบเฉพาะบางรอมได้ไหมครับ
ผมลองเคลียร์มันเคลียร์หมดเลยเหลือแต่รอมหลักนะครับ
Wipe Rom ทีละตัวครับ
ผมหมายถึงว่าการคัดเอารอมใดรอมหนึ่งออกนะครับ ที่ไม่ใช่รอมหลักนะครับ
เช่น
รอมหลัก คือ Primary (อันนี้คงไว้เสมอ )
รอมรอง ก็คือรอมที่เราตั้งหมายเลขดาต้าไว้
เช่น Data 200
Data 400
Data 600
และบังเอิญว่า ผมอยากจะเปลี่นเจ้า Data 400 ( คือเอามันออกไป ) เราสามารถทำได้ไหมครับ
โดยที่รอมอื่นๆ ยังคงอยู่ครับ
ขอบคุณครับ
flash DualBootUtilities ผ่าน recovery
เลือก Rom ที่เราต้องการ wipe
เลือก wipe /system , /data , /dalvik-cache
ครับ
เข้าใจแล้วครับ
ขอบคุณครับ
ถ้าไม่ได้ยังไงเดี๋ยวคืนนี้ผมแคปหน้าจอมาแปะให้นะครับ
ขอบคุณครับ แต่ทำได้แล้วละครับ
ลบ ซ้ำครับ